
Curiosity is something I have always cherished, especially in children. There is magic in a child’s wide-eyed question, “Why does this happen?” Over the years, I’ve tried out many science experiments at home, and I can say: you don’t need special equipment or a lab coat to inspire wonder. You only need a few everyday items and a willingness to discover with your kids.
What makes a great at-home experiment?
Whenever I set up experiments, I think about safety, simplicity, and that moment of surprise. The best experiments are safe to perform at the kitchen table, use common household items, and lead to that “wow” moment. They also nurture critical thinking in kids—they don’t just see what happens, they ask why.
Science is about questions as much as answers.
I want to share some of my favorite simple experiments that can spark curiosity and learning for kids (and grown-ups too). I hope that, as you try these, you experience the same sense of wonder I have seen many times.
Invisible ink messages
When I was young, there was something thrilling about writing secret messages. To this day, I find that kids can spend ages with the power of invisible ink. Here’s the secret: you can make invisible ink with lemon juice and see it appear like magic. It’s easy, and it feels just like being a detective.
To do this experiment, you need:
- Lemon
- Small bowl
- Cotton swab or paintbrush
- White paper
- Light bulb or hair dryer (with adult help)
First, squeeze the lemon juice into the bowl, add a few drops of water, and mix well. Dip the swab or brush into the juice and write a message or draw a picture on the paper. Let it dry—nothing will show up at first. When it’s completely dry, hold the paper carefully over a warm light bulb or go over it with a hairdryer (watching closely for safety). The heat will turn your writing brown, revealing your secret note.
The science: the lemon juice oxidizes and changes color when heated, making your writing appear.
I love watching the looks of surprise as the message “magically” appears. Moments like these are core memories.
The rainbow in a glass experiment
Few things catch the eye quite like a rainbow. Creating a rainbow indoors, with just sugar, water, and food coloring, is a visual feast and a great lesson about density.
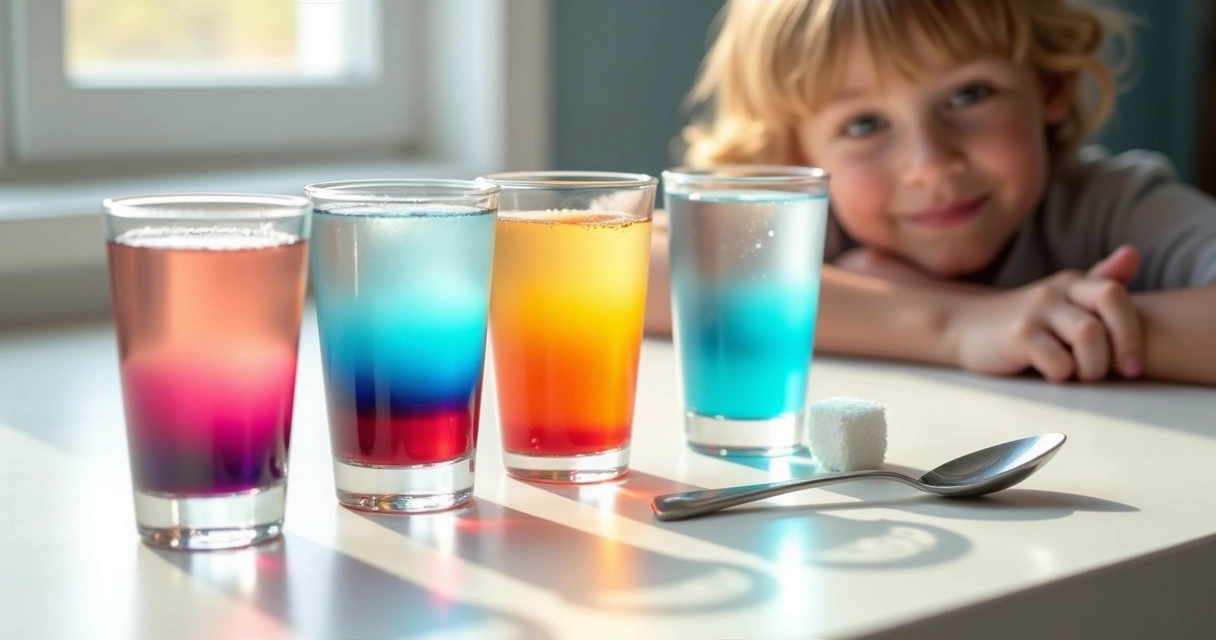
Here’s how to layer a rainbow in a glass:
- Four clear glasses
- Water
- Sugar
- Food coloring (four different colors)
- Spoon or pipette
Mix ¼ cup of water with sugar in each glass: no sugar in the first, 1 tablespoon in the second, 2 tablespoons in the third, and 3 tablespoons in the fourth. Stir until dissolved, then add a different color to each glass. Slowly, using a spoon or pipette, layer the heaviest (most sugar) at the bottom of a new glass, and gently pour the next, going from most to least sugar. Watch as striking rainbow bands settle in the glass.
Liquids with more sugar are denser and sink below those with less sugar, forming colorful layers.
I always remind kids not to rush. The slower the pour, the clearer the layers. This teaches patience and brings out that “aha” reaction with every color that stacks in place.
The dancing raisins surprise
This one is quick and fun, and illustrates a basic scientific principle in a way that gets giggles out of almost everyone.
For the dancing raisins experiment, you need:
- A clear glass
- Sparkling water or club soda
- A small handful of raisins
Pour sparkling water into the glass, then drop in several raisins. At first, the raisins sink, but soon they begin to bounce and rise to the surface. It looks almost like a small underwater dance party.
Bubbles of carbon dioxide from the soda stick to the rough surface of the raisin, lifting it up. When the bubbles pop at the surface, the raisin sinks again.
This playful process repeats for quite a while. I always find myself grinning along with the kids.
Homemade lava lamp
One experiment that always reminds me of childhood is a homemade lava lamp. The glowing blobs swirl and float in a bottle, offering both color and movement. And it’s much safer than having a real lava lamp near energetic hands.
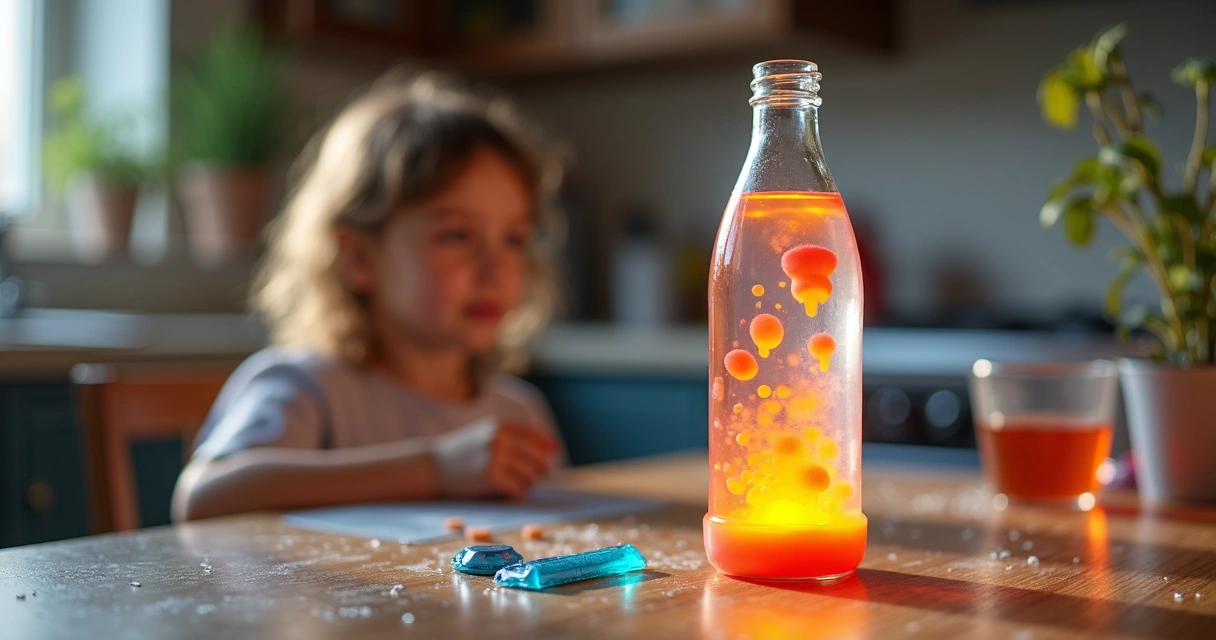
For this experiment, you’ll need:
- Clear plastic bottle
- Vegetable oil
- Water
- Food coloring
- Fizzing tablet (like an antacid tablet)
Fill the bottle most of the way with oil. Add water until the bottle is nearly full. Notice how the water and oil do not mix—the water sinks to the bottom. A few drops of food coloring will tint the water layer. Finally, break the tablet in half and drop it in. Colorful bubbles rise and fall, just like in a real lava lamp. The movement fascinates everyone, every time.
The oil and water don’t mix because they have different molecules. The fizzing tablet creates gas bubbles, which carry colored water up and down through the oil.
I’ve seen this spark a conversation about why oil and water don’t mix, which is a gateway to all sorts of science discussions.
Balloon rocket challenge
Nothing brings out energy like a race. With this next experiment, kids use their own breath to launch a balloon “rocket” across a room or hallway. I find this is an exciting way to show how air exerts force.
You’ll need:
- Long piece of string (about 2-3 meters)
- Drinking straw
- Balloon
- Tape
- Two chairs
Thread the string through the straw. Tie one end to a chair or doorknob and pull the string tight, tying the other end to a second chair. Inflate the balloon (but don’t tie it), tape it to the straw, and hold the balloon at one end of the string. When you let go, the balloon races along the string, powered by air rushing out. It’s like building your own mini-rocket.
When air escapes quickly from the balloon, it pushes the balloon forward along the string.
Try races with different sizes or shapes of balloons. I have heard shouts of victory and laughter as siblings compete to see whose rocket goes fastest.
Growing crystals overnight
If patience is one of your virtues, this experiment is for you. Growing your own sugar crystals is a mix of science and art. Plus, the results are beautiful.
You’ll need:
- A glass jar
- String or wooden skewer
- Hot water
- Sugar
- Food coloring (optional)
Dissolve as much sugar as possible in a cup of hot water (adult help needed for safety). Tie string or rest a skewer across the jar’s mouth, making sure it is suspended in the liquid. Add a drop or two of food coloring. Leave the jar undisturbed overnight. The next morning, crystals form along the string or stick—nature’s version of gemstones.
This shows kids how crystals form when the sugar in hot water cools down and turns back to a solid, arranging itself in neat shapes . I always find myself just as fascinated as the kids the next day.
Why do these experiments matter?
Over the years, I’ve seen how these simple activities do more than fill time on a rainy afternoon. They build curiosity, patience, and confidence. Every experiment is a small step in helping a child see the world through questioning eyes.
Sometimes, a question like “Why did that happen?” leads to a discussion that continues long after the experiment is done. These experiments give memorable answers—and even better, raise new questions—to keep learning alive.
Questions are where discovery starts.
Tips for making science at home exciting
I’ve gathered a few simple habits that can make science time at home even better:
- Let kids predict what will happen before starting.
- Ask open questions instead of giving answers right away.
- Show enthusiasm—it’s contagious.
- Repeat experiments with small changes and compare results together.
- Celebrate curiosity as much as “getting it right.”
These little changes, in my experience, help kids feel like real scientists. And sometimes, they teach me something new too.
Conclusion
The kitchen table, the living room floor, or a sunny spot by the window—all these places can turn into discovery zones for curious minds. You don’t need anything fancy. Just simple materials, time, and a sense of fun. Science is not just for classrooms—it’s for homes, hands, and hearts, every single day.
If you try any of these experiments, you might find that the “wow” moments don’t stop with the kids. I know mine haven’t.